How to Start Email Marketing From WordPress?
How to Start Email Marketing From WordPress?
In 1978, the first marketing email was sent. That’s how old it is.
Since then, its popularity has steadily increased. People nowadays receive lots of emails from marketers daily, all seeking their attention.
So, why use email marketing if the field is so competitive?
There are 4.6 billion email users globally, and 51% of them prefer brands to communicate with them via email. Moreover, several studies show that email marketing continues to outpace other digital marketing channels like social media and PPC.
Whether you’re a small business owner or a large retailer, overlooking a tool as important as email marketing will be a mistake.
Also Read – Top 7 Ways To Monetize Your WordPress Website
Getting started with email marketing from WordPress –
Email marketing is the most effective way to build a relationship with your visitors and convert them into regular readers and ultimately paying customers.
In this guide, we’ll walk you through every step of email marketing from WordPress.
So, let’s get started.
The first step is to add email subscriptions to your WordPress site. Asking your website visitors to sign up for your email list is the easiest way to do this.
Don’t worry, we’ll guide you on how to add email subscriptions to your WordPress site and – more importantly, how to send an automated welcome email to your new subscribers as soon as they sign up!
In short, we’ll show how you can add a whole email marketing mechanism to your WordPress site. And all of this can be done for free.
Tools required to add email marketing to WordPress –
With WordPress, you can build robust websites. However, because of the huge number of plugins available in the WordPress repository, you have access to an abundance of fantastic tools for improving its performance.
And so it’s no surprise that there are a bunch of excellent email marketing plugins available in the market. For example, FluentCRM is a great email marketing tool that comes for free with a native email subscription marketing automation plugin for WordPress.
Besides, we’ll need two additional plugins that work with FluentCRM to set up an email marketing system on your WordPress site. Guess what? They’re all free and don’t require any manual installation.
For our demonstration, we’ll use the following plugins:
- FluentCRM
- Fluent Forms
- FluentSMTP
1. FluentCRM –
FluentCRM is a free WordPress email marketing automation and CRM plugin. We’ll use it to build our email subscriber list as well as send out emails.
This CRM plugin features contact profiling, segmentation, email marketing automation, email campaign management, and a granular reporting system. It also offers a premium version with a slew of extra features and integrations with several WordPress plugins.
2. Fluent Forms –
Fluent Forms is the most advanced free form plugin for WordPress out there, considering its sturdiness and the number of features it offers. This will be our email subscription plugin for collecting leads.
Although we’ll be showing you how to build contact forms in less than 30 seconds and plant them on your website, Fluent Forms is capable of much more than that. Complex forms, such as conversational forms and multi-step forms, are a breeze to build with it.
3. FluentSMTP –
WordPress-triggered emails are PHP emails delivered through your web host. PHP emails are often blocked by email clients or filtered as spam. Furthermore, hosting servers aren’t even designed to send a large number of emails. Therefore, for email delivery, we’ll use FluentSMTP.
FluentSMTP is a free SMTP plugin for WordPress that allows you to integrate your site to third-party email services to send marketing and transactional emails. Most email sending providers allow you to send a large number of emails for free, and we’ll use one of these.
Using WordPress to add email subscriptions –
The FluentCRM-Fluent Forms-FluentSMTP trio resolves all of the questions you should consider before starting up an email subscription system. They capture leads for your business and assist you in sending marketing emails that get delivered no matter what.
Let’s get started on adding email subscribers to WordPress without further ado.
Install and set up FluentCRM –
To reach your goal, this is the only plugin you’ll need to install and activate. The other two plugins can be activated while you’re setting everything up.
To get started, go to your dashboard, then go to Plugins>Add New.
Then, look for FluentCRM and click the Install Now button. Once the plugin has been installed, you can activate it by clicking the Activate button.
Starting with FluentCRM –
You’re ready to start using FluentCRM now that it’s been activated. So go to your dashboard and look for FluentCRM on the sidebar.
A setup wizard will appear when you click on the plugin. To begin, click on the large green button.
You need to enter your business information in the next window. These will appear in the footer of your email. As your company’s information and address are required to send marketing emails, you should fill out these boxes appropriately.
In addition, for footer branding, you can upload your company logo.
Then, to segment your contacts, build the Lists. This should be done according to the category in which your contacts fit. We made two lists as an example. One will include all of our email subscribers, while the other will only include those who have just signed up for our blog.
You can generate tags to filter and sort contacts in the same way.
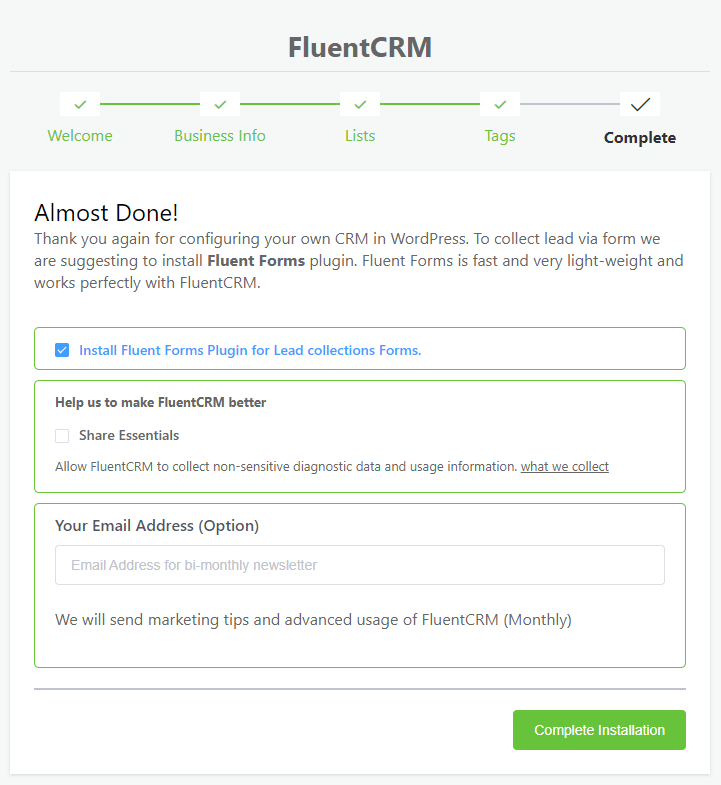
In the following window, you’ll be asked to install Fluent Forms to capture leads. Keep that option checked to have Fluent Forms installed and activated automatically.
You can also share anonymous info and your email address in some cases. They are, however, completely optional. FluentCRM will display a congratulatory message after you click the Complete Installation button to complete the configuration.
You can either choose Import Contacts or go straight to your CRM dashboard if you already have an email list. We’ll go with the second choice.
The dashboard of FluentCRM provides detailed information about your email subscriptions, campaigns, contacts, and emails. On the right sidebar, you’ll find the steps you took to get started, as well as a few quick buttons to different options.
The FluentCRM installation is now complete. From here, we can perform several tasks. However, there is one more thing we need to take care of beforehand.
Configure an email sending service –
That’s exactly what we’ve been lacking. Because no email marketing platform can function without an email service provider, we’ll need to utilize FluentSMTP to connect our WordPress site to one.
To start off, select View Email Sending Service Settings from FluentCRM’s right sidebar.
This will take you to FluentCRM’s SMTP/Email Sending Service, where you’ll be asked to install FluentSMTP, a Fluent plugin that allows you to link external email sending providers with both WordPress and FluentCRM. To enable the plugin on your website, click the big green button.
Click Configure FluentSMTP once again.
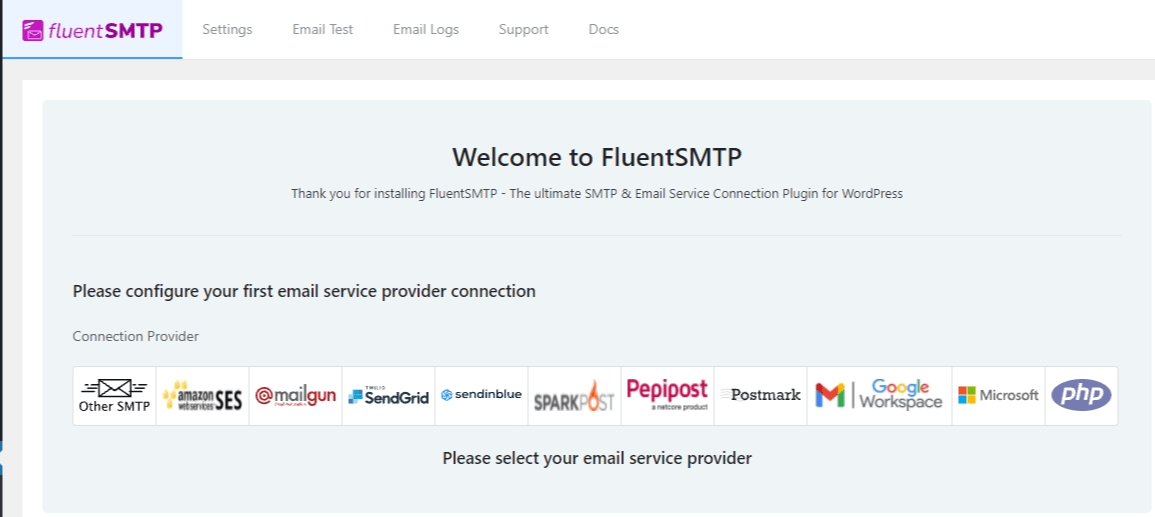
This will lead you to the FluentSMTP setup process, where you can set up any third-party email sending service for FluentCRM as well as your WordPress site.
Almost all of these email sending services provide a free email sending limit before charging a little fee as you scale up.
Our recommendation for you will be Amazon SES if you send lots of emails. It’s a lot less expensive than other options, and you can send an unlimited number of emails with it.
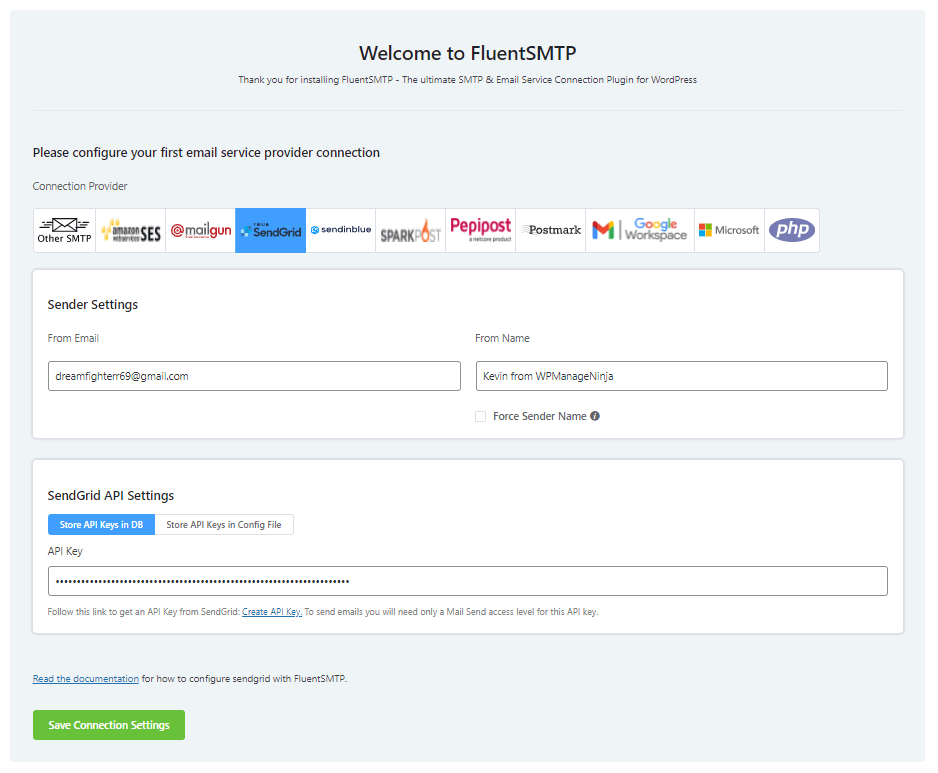
Anyway, here we’ll use SendGrid since we promised to set up the email subscription for free on WordPress.
Simply create a free account and follow the instructions to receive your SMTP API keys. Then return to FluentSMTP and complete the fields as shown below:
To finish the setup, click Save Connection Settings.
You may also use the Email Test tab to send a test email to any email address of your choice. If that email makes it to your inbox, your WordPress emails are up and running.
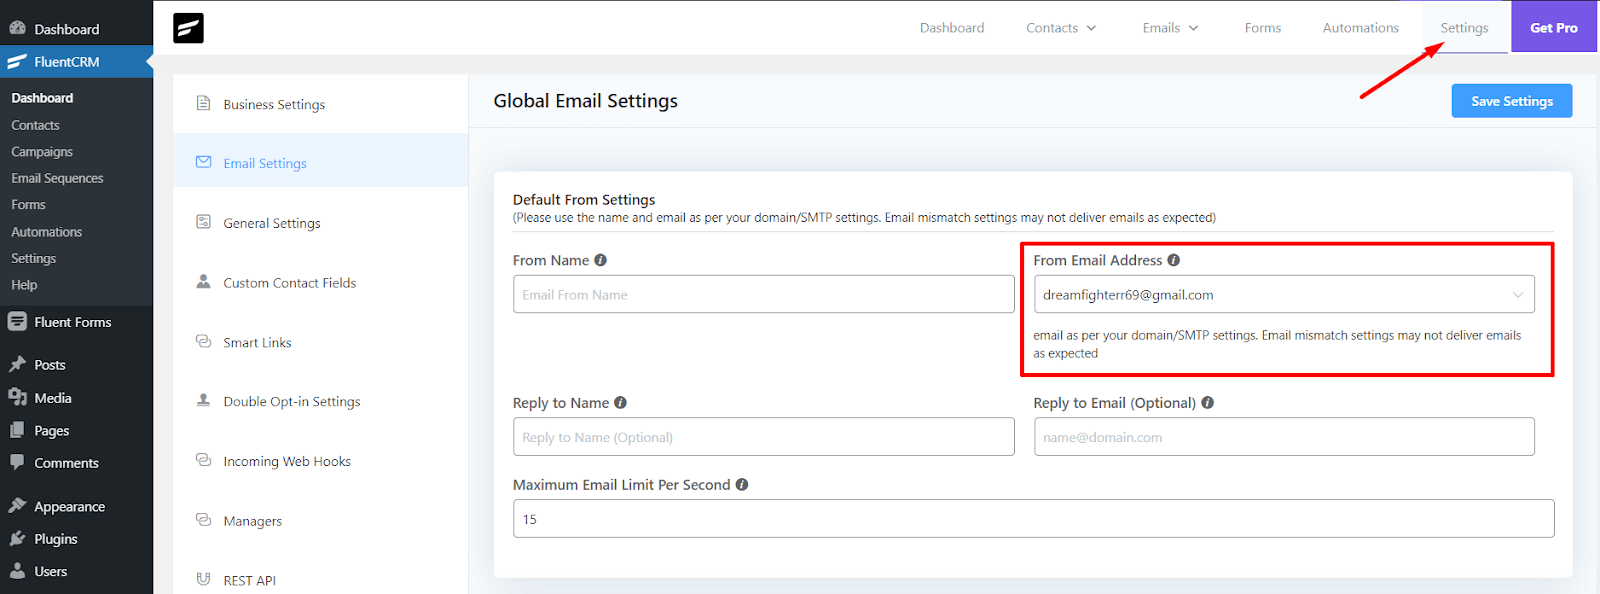
Now that your email sending service is set up, go back to FluentCRM>Settings>Email Settings. Select the email address you just entered to FluentSMTP in the From Email Address section.
When you’re finished, click Save Settings to finish configuring FluentCRM’s email sending service.
Making an email subscription form –
With an email subscription form, you can collect email subscriptions. So, go to FluentCRM’s Forms tab and select one of the options to make your first email subscription form.
You’ll find three pre-made templates in the pop-up to help you get started. Select any template you like.
We’ll go with the first option because it’s easier for visitors to simply enter their email address.
It will next ask you to name your form and categorize email users using Lists and Tags. You can also turn on or off double-opt-in confirmation from this page.
After you’ve finished setting them up, click Create Form. The form shortcode will display in a success message, along with choices to Preview, Edit, or Change the Connection Settings.
If you don’t want to make any changes, copy the form shortcode and close the pop-up.
Now you can use the form shortcode wherever you want on your website, including blog posts, footers, landing pages, and even the home page.
If you think your visitors will be more inclined to leave their email addresses in a specific location on your website, put your form there.
Creating an email marketing automation workflow –
So now we are just one step away from installing a functional email marketing system to your WordPress website.
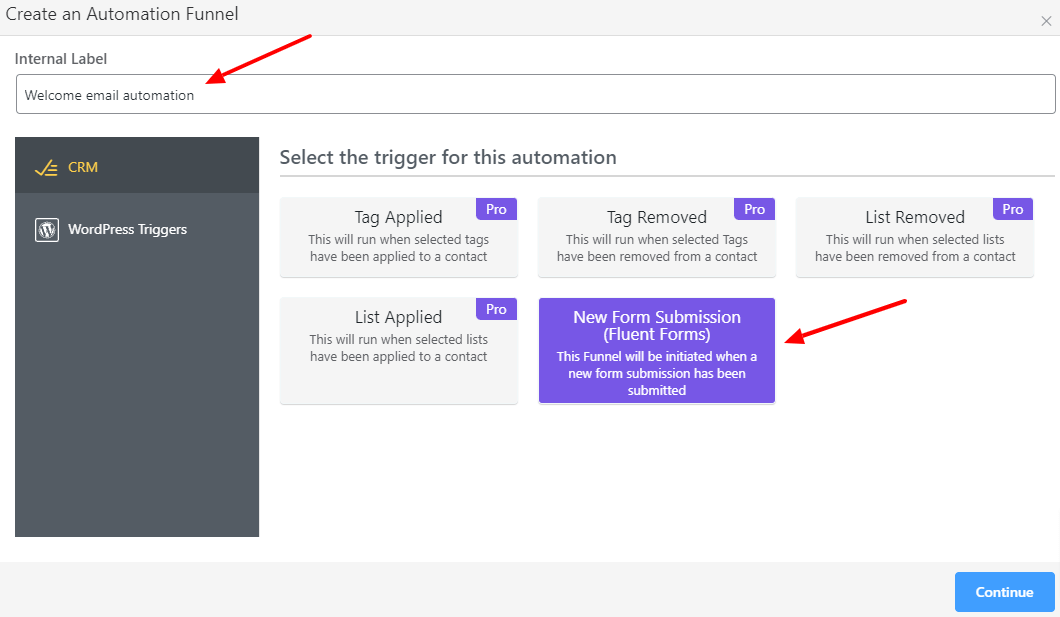
To start off, go to the automation tab and click Create a New Automation.
This introduces the concept of triggers. Consider them to be online events, such as visitors visiting your site, signing up for your mailing list, purchasing things, and so on.
In this scenario, our visitors are filling out a form. As a result, we’ll select a New Form Submission trigger and click Next. Don’t forget to assign an internal label as well!
You must configure the trigger once the automation window has opened. So pick your form and start mapping the fields. You can leave the rest of the settings alone and click Save Settings.
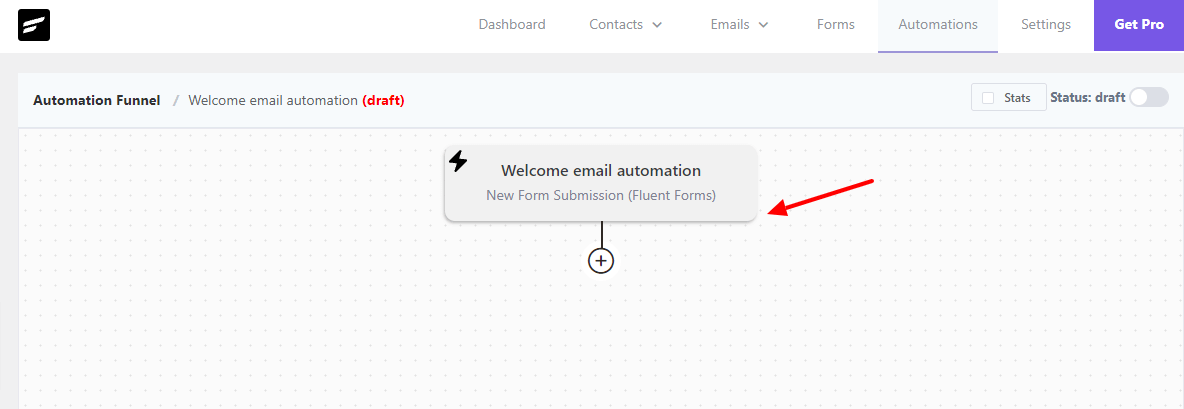
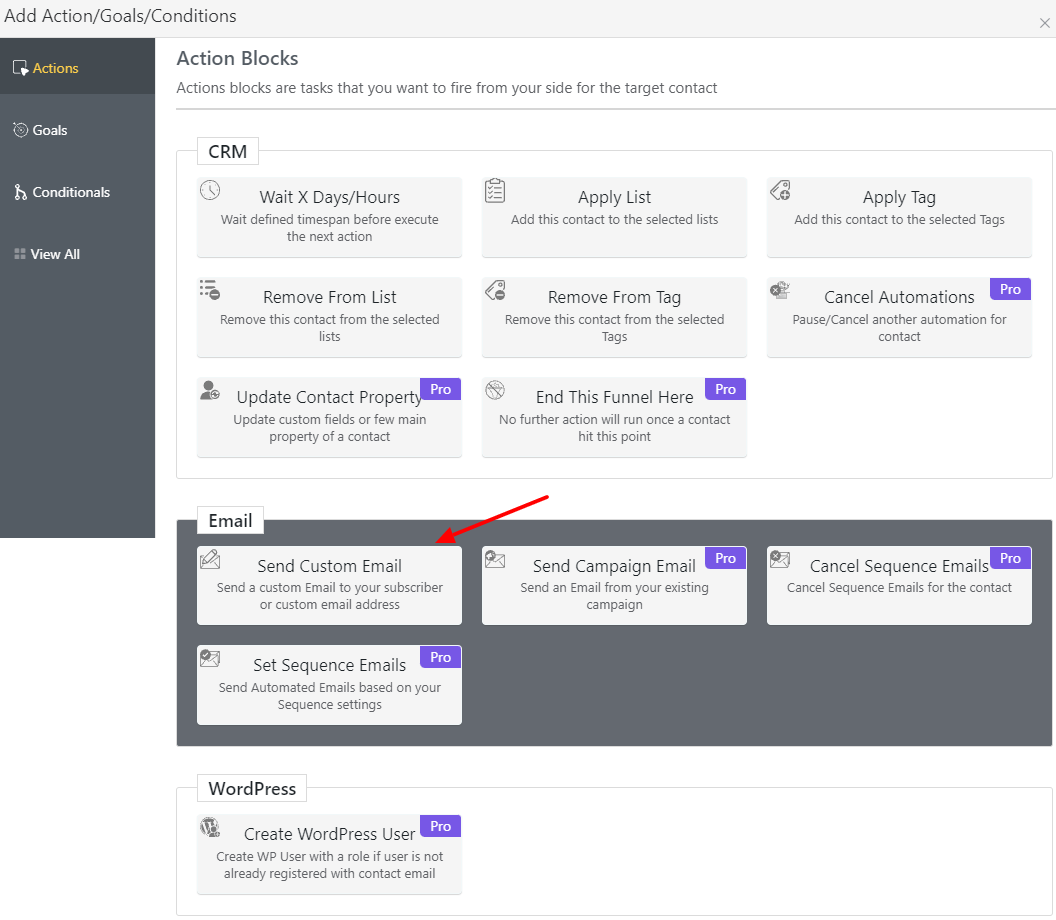
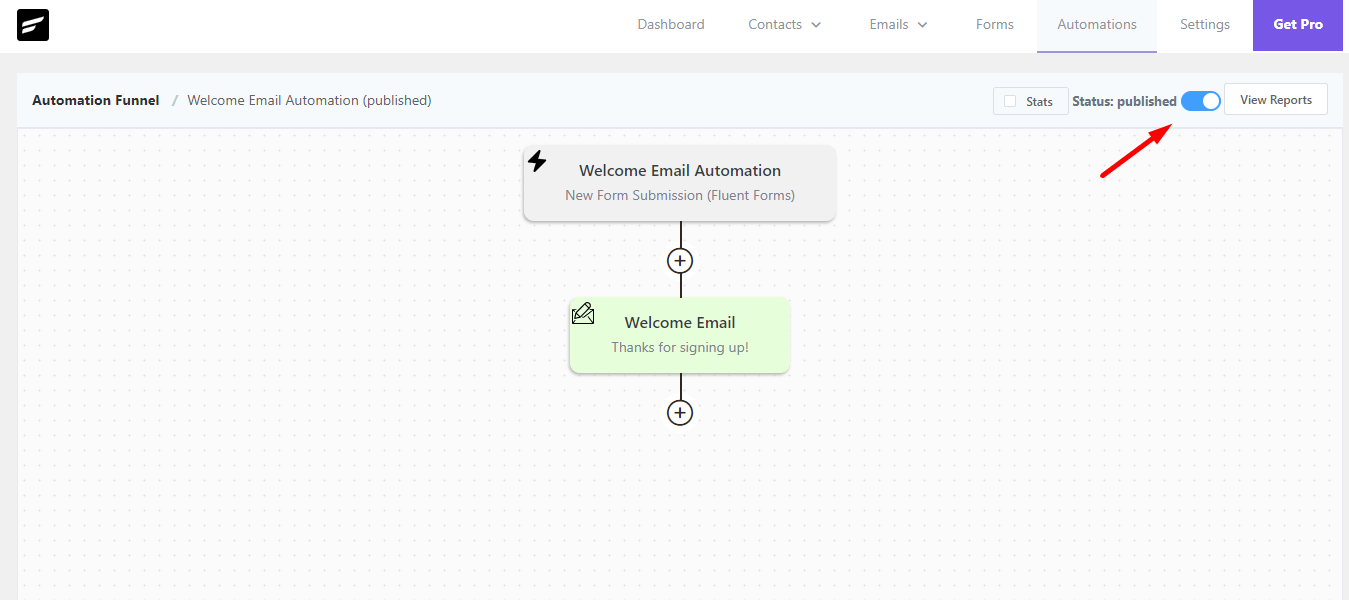
This will provide a visual funnel window where you can set up email automations depending on various criteria. You must click the plus (+) button to add conditions or actions.
To be honest, there are so many things you can do that it can be confusing at first. You can delay events, apply or delete lists and tags, edit contact properties, send various types of emails, create WordPress users, and more.
And these are just some of the things we’ve done so far. You can create advanced automation funnels using goals and conditionals.
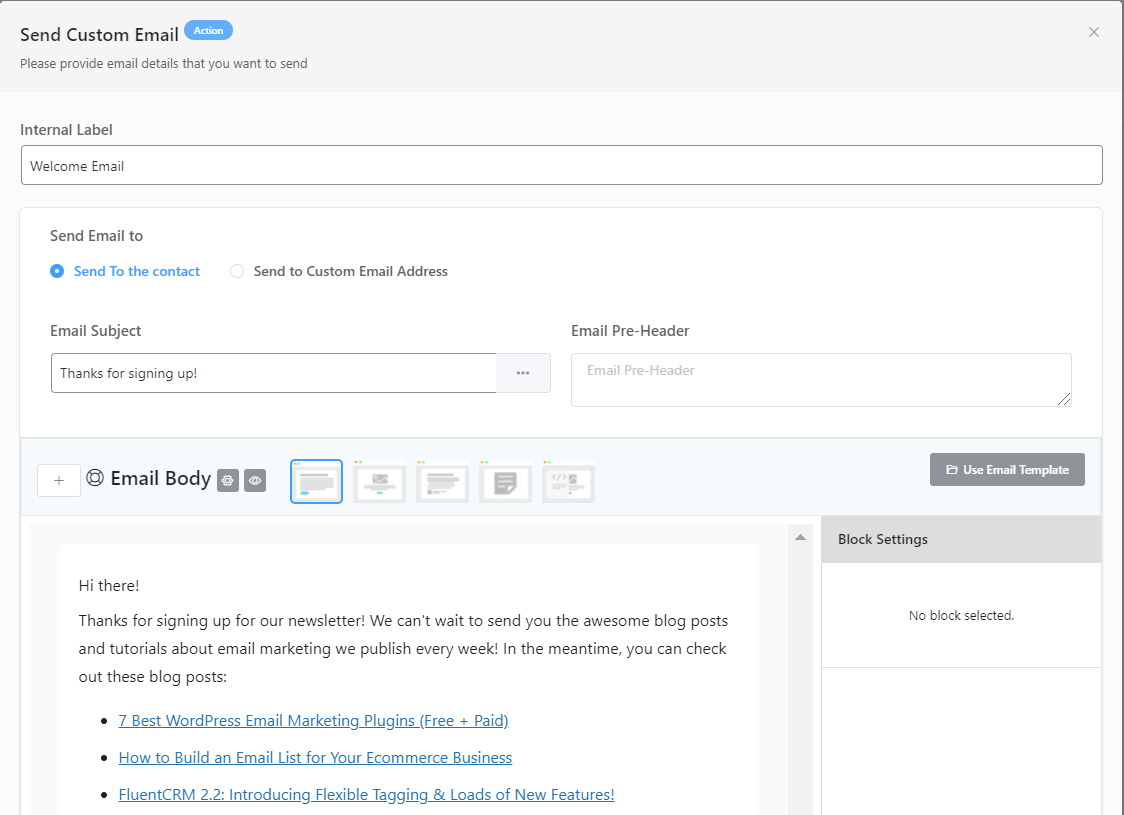
We only need to create a welcome email, therefore we’ll use the Send Custom Email action.
Start writing your email now. Fill in your subject line and any pre-header text you want to show.
In FluentCRM, you can use both the block editor and the standard editor to compose emails. You can also create your own HTML-coded email!
Click the Save Setting button once you’re finished.
So far, we’ve set a form trigger and added a welcome email to the mix. Have you noticed that automation is included in the draft? To activate the automated funnel, just toggle it to Published.
And our automated welcome email is now ready to greet the new subscribers!
Conclusion –
Your company will make more money if you have more email subscribers. Simply put, it’s that easy. We could go on and on about the necessity of email marketing, but the fact is that it works.
We just went over how to set up email subscriptions to your WordPress site and how to send a welcome email to new subscribers. If you followed our tutorial, you’ve not only created an email newsletter, but you’ve also implemented an entire email subscription system.
Let’s review what we did to reach our target:
- In our WordPress dashboard, we’ve installed and activated an email marketing tool
- Configured and linked to an email-sending service
- Built an email subscription form to capture leads
- Included an automated funnel that automatically sends a welcome email when someone registers using our form
And, as we said before, both FluentCRM and Fluent Forms provide a plethora of other features. So keep looking into the tools, figuring out new ways to boost email subscriptions, and create awesome new email marketing automation funnels and campaigns.
Also Read – Steps For Producing An Incredible WordPress Web Design

